Pages

Monday, April 30, 2012

It's A Small World

Over the weekend I went to a party to celebrate my friends accomplishment of running in the Country Music Half Marathon. They trained for a long time and they made it to the finish line.

Flashback a few years ago. I was on Facebook talking to some friends. You see when I was in High School in New Jersey my parent's decided to move to Tennessee. I was going into my Junior year of school. It was summer and I didn't get to say goodbye to a lot of my friends. It was not like today. No cell phone, No Facebook, No Skype, just a few hand written letters. (Remember those?) Needless-to-say, it was very traumatic to me.

Then a few years ago I got Facebook and was once again connected to the many friends I had left. Some looked different, some still the same and some I can remember the name but not the face.

I go back home to see family and friends from time to time. Leaving NJ kept me holding on to memories that most forgot. After all it, was the place where I grew up.

One day I was commenting on a friends status from NJ and my girlfriend Colleen wrote that it was hot in Tennessee. I commented, "How do you know?" She said, "Cause I live here!" When I asked where she informed me that she lives close to me! ........WHAT?!!....... It is a small world!


So this weekend she invited me over to celebrate her accomplishment and said that another one of our friends was flying in to join her. Colleen and Tara are best friends. I haven't seen Tara in 32 years! Yeah I said it!! YUK! It really freaked me out that it had been so long!!!


I surprised her. It was weird how everything just kinda fell in place. We talked about school and friends we had in common. The strangest thing though was how our daughters were so much alike. It was so much fun. It is great to rekindle friendships. I have some really great friends. I hope to keep in touch with these girls.

This year I will be celebrating my 30th reunion. Looking back I realize that things are different now that I am older. There are a lot of things that mean more to me now. One thing is I cherish my friendships even more!

I love making new friends too. Blogging has introduced me to a lot of new ones!!! What kind of "small world" experiences have you had?

You are never too old for friends!
Thanks for being here!

Thursday, April 26, 2012

I Need A Little Help From My Friends/Summer Chair

Now that Picnik has gone away (boohoo) I am asking for help!! All my friend out there please tell me what is the easiest thing to convert to? I have heard of a few but you are the ones that have tried them so PLEASE let me know!!

I am getting excited because Haven is just around the corner and I get to meet some of you wonderful bloggers in person! I am leaving for Atlanta to pick up my daughter from school...packing etc, for the summer and I am going to the beach for two weeks!!! Yipee!!! My love for the ocean runs deep in my soul. I cannot wait!

As I sit here dreaming of the day I leave, I decided to add some beachiness to some furniture. I already painted the china hutch in a blue with a white wash. Now, I found this checked blue chair that needed a little updating.


The upholstery was in excellent condition! I wanted to paint the wood in old white and distress it.


Tried to distress it in all the right places. Then waxed in a clear wax.


To me it looks like something out of Ethan Allen. It is not over done.Would look great in a beach house!

I guess the mood took over and now everything I look at I want to remind me of the sea.....

Don't forget to tell me what you are using for picture editing!! Thanks my dear friends!

I am feeling like doing a giveaway soon.........it's been awhile!

(Mary if you are reading this, my fingers are still crossed for RL!)

Monday, April 23, 2012

Banana Trifle with a Kick and a visitor

Second attempt to post

I love to cook and bake! Pinterest has really been a great place to find inspiration! From time to time I like to search the internet for something to try and that is how I came across this recipe.

This is a recipe that I will definitely do again. It takes a traditional banana pudding and gives it that extra something to send your taste buds crazy!


What makes this so different is the rum and bourbon. The tastes combine with the sweetness of the bananas and the toffee crunch!


Combine first 3 ingredients in a large heavy saucepan; whisk in milk. Bring to a boil over medium heat, whisking constantly. Remove mixture from heat

Beat egg yolks until thick and pale. Gradually stir about one-fourth of hot mixture into yolks; add to the remaining hot mixture, stirring constantly. Cook, stirring constantly, 1 minute. Stir in vanilla

 
Layer one-third of wafers in the bottom of a 4-quart baking dish. Stir together bourbon and rum; brush over wafers. Top with one-third of banana. Spoon one-third of custard over banana, and sprinkle with 1/3 cup crushed candy bar. Repeat procedure twice


Beat whipping cream at medium speed with an electric mixer until foamy; gradually add powdered sugar, beating until soft peaks form. (I used Cool Whip) Spread whipped cream over trifle, and sprinkle with remaining crushed candy bar. Cover and chill 3 hours


 I promise you will not be disappointed! The recipe is below:


Ingredients

  • 1 1/3 cups sugar
  • 3/4 cup all-purpose flour
  • 1/2 teaspoon salt
  • 4 cups milk
  • 8 egg yolks
  • 1 tablespoon vanilla extract
  • 1 (12-ounce) package vanilla wafers
  • 1/4 cup bourbon
  • 2 tablespoons rum
  • 6 ripe bananas, sliced
  • 6 (1.4-ounce) English toffee candy bars, crushed
  • 2 cups whipping cream
  • 2 tablespoons powdered sugar
Preparation
  1. Combine first 3 ingredients in a large heavy saucepan; whisk in milk. Bring to a boil over medium heat, whisking constantly. Remove mixture from heat.
  2. Beat egg yolks until thick and pale. Gradually stir about one-fourth of hot mixture into yolks; add to the remaining hot mixture, stirring constantly. Cook, stirring constantly, 1 minute. Stir in vanilla.
  3. Layer one-third of wafers in the bottom of a 4-quart baking dish. Stir together bourbon and rum; brush over wafers. Top with one-third of banana. Spoon one-third of custard over banana, and sprinkle with 1/3 cup crushed candy bar. Repeat procedure twice.
Beat whipping cream at medium speed with an electric mixer until foamy; gradually add powdered sugar, beating until soft peaks form. Spread whipped cream over trifle, and sprinkle with remaining crushed candy bar. Cover and chill 3 hours

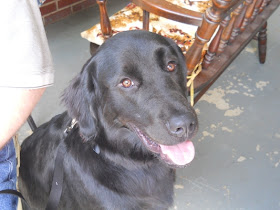
 Remember this guy! He is getting big! He is turning 1 this month!


What a year! He is still in the puppy stage but he has been the most precious dog! So lovable! He has tore up my side yard. He ripped apart a beautiful bush and rose bush outside our door. I have never seen a dog do that before. He is a disaster at times! But look at that face!! He is like having a two year old. He keeps us hopping but the love given back is unmeasurable. He was adopted from a shelter. People don't believe us when we tell them because he is so handsome. I have adopted animals all my life. They are the best! Probably because they are so grateful.


Now its time to plan his party. I go get my daughter from college this week. We will plan it together.
Fun times!!


Thursday, April 19, 2012

How to Remove Wood Veneer/Laminate

Sometimes I feel I have projects that overlap each other! Many stay captive to my Nikon or computer! One day I will sift through them all and post the ones that never have been seen. Does this happen to you?

I can take pictures everyday but I procrastinate on my posts. This is a project that I started a few months ago and just finished this week.

My sister gave me a little antique table that had such sweet lines. There was a big problem. The top had a big chunk of laminate out of the corner. My first thought was to cover it with some paper to hide it but felt that it would still look uneven.


This was a perfect candidate for paint! I was puzzled on what to do. Then I remembered the little old man that put in our laminate counter tops years ago at our old house. He talked about how heat molded the laminate to the top of the wood. He told me that he removed wood laminate the same way. With HEAT!

Soak an old rag with water and wring out. Lay on top of table and iron over it. The heat will loosen the laminate enough to peal off!!


What would have taken hours to chip away took minutes to scrap off because it came off in big pieces.


After completely dry I sanded it smooth. I painted, distressed and waxed it.


This is the corner that was chipped! Not bad huh?


I love the way this method took a piece that was tossed for garbage to a beautiful accent table!
I added my pattern puff to a stained terra cotta pot for some easy eye candy!

Maybe you would want to paint this like I did with my butterfly table
from last year


Wanted to share this with you so you can try it!

Remember think twice about passing up a piece like this!!

Another thank you.....

Thanks to Knock Off decor for featuring my Chalkboard Art!!

Thank you for being here reading my posts and all your sweet comments!!!

Stuff and Nonsense

Monday, April 16, 2012

Painted China Cabinet

I am doing a lot of cleaning out these days and getting projects finished! In the late summer I like to stock up on various pieces for the fall and winter months. By doing this it allows me to pick and paint what I want for the store. Some of my earlier pieces needed some work so I put them off. Now with spring here I want to clear out so I can start new and fresh.

This little china cabinet needed some love. It had a hole cut out of the back for a TV. My hubbie replace the wood for me so I could begin painting. The shelves went MIA and I was so glad to find them the other day. So there was no excuse!


This is what I started with after he fixed the back. I took this pic at night sorry.

I don't know about you all but it takes me awhile to come up with paint color. I have to stare at it awhile.

I decided on Duck Egg and Old White with some dry brushing and distressing.

I painted the shelves Duck Egg and the back ot the inside with Old White. I actually kept the knob!


I used the Old white to highlight some of the details. I also used it to dry brush.


You can see it better in this close up!

 Love the distressing around the knob!!!


The inside finished and ready for some decorative items.


Placed it in the kitchen and added some color!


Another amazing transformation with paint!

I want to thank Kim Too Much Time on My Hands for featuring my Paint Stick Flag and Utensil Draw Organizer! So Sorry I forgot to mention it!!

Also I want to thank Claire from Bless My Nest for featuring my Nesting Bird Table!!!

Thank you ALL!! It is always a thrill!!


Miss Mustard Seed's Creative Blog

Thursday, April 12, 2012

Antique Chair Leg

You know you have done it too! You go out thrifting and yard saling and bring back that odd piece of something. Sometimes those are the pieces that inspire you the most. Sometimes they are the ones that sit in a corner waiting for you to think up that one creative thing that can turn it into beauty.

Last year, don't judge, I went to the Watertown Yard Sale in Tennessee. I was a little disappointed to see mostly venders set up but there were some that were the true yard salees!  I actually managed to come home with a few great pieces. Well they were great at the time!

This is one thing that I found


 It was an antique chair leg! I thought it was an interesting find.

Problem was it sat in a corner for a year! Then I decided what I wanted to do with it. I grabbed some barn wood and dry brushed some gesso on the front and wired it to the board.

I had a piece of brass and some new metal stamps that I wanted to use.

I went outside in the beautiful sunshine and stamped and hammered away!

This is what I came up with! I sweet saying to add to my art piece.


I hammered the brass and sanded it to look worn. "Where there is Faith love grows"

Then I attached my antique chair leg to it. Because I have stared at it for soooo long I love that it looked like a wooden cross.

I turned it upside down and tied it to the barn wood with nails and jute.


I love it next to the roses! It can be used as garden art or I can hang it on the wall. I attached a saw tooth hanger to the back just in case!


What do you think? Would you use this to hang on a wall or use it for garden art? You know me. I just like something out-of-the -box different!!!

Enjoy this beautiful day the Lord has made!!!

>
WhipperberryMiss Mustard Seed's Creative Blog

Tuesday, April 10, 2012

Chalkboard Art


I love art of any kind! I have been intrigued lately by chalkboard art. I have seen it on the blogs, in stores and now in OPRAH"S magazine.

Dana Tanamachi was the cover artist for the magazine and she has several other's she has done.


Here is one she did in Turquoise!

If you were here yesterday I showed you my latest chalkboard project. I used a painting technique to change a gold plastic frame to a stone look.

So after being mesmerized by the beautiful typography of this powdered art, I decided to let this be my inspiration!


I wanted somewhat of a menu board so I thought this would work perfectly

I used some color chalk and good ole white


I did it all by hand with no patterns. I wanted it to look free hand....not perfect

I thought it was fun and I will probably do more in the future!

Have you tried some art on your chalkboards?

TELL ME WHAT YOU THINK!!!


Monday, April 9, 2012

Stone Texture Technique with Paint

While shopping for that extra something to be creative with, I found this picture. No, I haven't got a place for it in my house! Not my style! But I think I can create something with it!


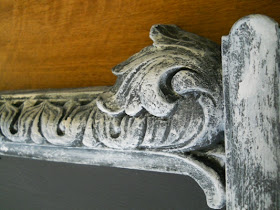
I did like the frame with all of its carved details. It was a plastic frame but I was going to turn it into stone! Well with paint of course. I used a dry brush technique like the one in my Lamp Redo post. I actually painted on and wiped off on that post. This one is painting light on dark.

I painted right over the print with chalk paint and continued to the frame. Using my brush to push paint into the crevices.

  This is how it looked when the paint dried. I went back and touched up any surface that I missed.


With detailing like this it is easy to highlight. I used gesso and dry brushed in a circular motion. In my lamp redo I used a beige paint. The key is to dry brush.


See how it starts to pull out the details. I love the texture the ASCP has when painted.


There really isn't a way to mess this up. Just make sure you don't cover over all the dark color.


This is some yummy detailing. It changed an ugly gold plastic frame into this!


What a change! OK I photo-shopped my blog on the chalkboard! Come back tomorrow to see my inspired artwork that is going on it with colored chalk!

How do you like the before and after?