recent posts...

Tuesday, April 26, 2011

No I don't live under a Rock!


ENTER THE GIVEAWAY!!!!


For months everyone in blogland has been doing chalkboards. Painting and spraying everything under the sun. It's like anything else that you see over and over. It starts to be appealing! Not that it wasn't when I first saw them but I started thinking about doing one on all different types of material. And you know how much I like quick simple and affordable things to do!

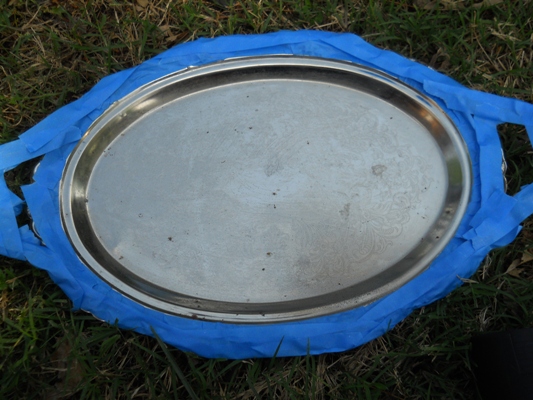
Soooooo when I was shopping at the Goodwill store I discovered a little tray to paint.

It was a nice shape and had great detailing and for 1.99 it was perfect.

I bought a spray can of chalkboard paint. The girl at Lowes said spray paint is better for small projects and a can of paint is better for walls and furniture.

I taped the outside details of the tray so the paint wouldn't get on it. This probably was the hardest part. Taping in a round or oval shape you want to make sure your lines don't look choppy when the tape comes off.

There were some imperfections in the tray but that's the beauty of it. The paint will cover it!
Spray the chalkboard paint in thin layers till you have a nice solid look. When completely dry get your chalk and rub it all over the black area to condition the piece. Then erase. Write anything you want on it!

My little twist is that I attached it to a candle holder. I think I will also use it again in a different way.
So you might think I lived under a rock by not doing this sooner, but I was just taking my time thinking how I can do something different with it.


Now I need to get some candles to go with it!

linking to http://junkernewbie.blogspot.com
Domestically Speaking

Monday, April 25, 2011

Monogrammed Wedding Gift

 ENTER MY GIVEAWAY HERE!


I received an order for a Monogrammed painting. It was a wedding gift for a young couple. The best part of things being custom is you can order what you want! Choosing an initial of their last name was just what was needed to make this gift special.

The customer wanted it to be modern and classy.  I painted zebra stripes and added pearl detailing to the initial. Wrapped in my signature wrapping and it was ready to go!

These are great gifts for weddings, mother's day, birthdays, anniversaries, baby showers, just about anything you can think of.

Hand painted Monogram canvas 6x6


If you would like to order the zebra print canvas check below
All orders come wrapped in clear cellophane and bow
$28 USD   Shipping $5.95 contiguous US
enter letter


linking to

Sunday, April 24, 2011

Pass It On


"It only takes a spark to get a fire going

and soon all those around will warm up in His glowing
That's how it is with God's love
Once you've experienced it
You want to sing 
It's fresh like spring
You want to pass it on...."


HAPPY EASTER!

Saturday, April 23, 2011

Easter Cocoa Nests


Yes Virginia there is an Easter Bunny!

.........And he still hops around here. Years ago he used to sneak in the window to fill Easter baskets and was a little sloppy leaving his powdered footprints around the house. One year the kids even set a trap and caught a bunny! He was the cutest stuffed one you ever did see. 
Now the Easter bunny lives in our backyard.....yes he does! I see him every morning from my sun room window happily hopping and eating all the flowers bad bunny

Like Christmas there is a certain magic that fills the air. We never forget the reason we celebrate. Faith and promise is something that gets you through this life and ready for the next. Spring makes us aware of all the beauty God has created for us! So we Rejoice!

I never want to forget that! That is why we still keep many traditions we celebrated when my children were young. So there are still Easter dinners with family, prayer, Easter baskets and cocoa drops!

My children are grown but there is one thing that they look forward to every year and that is cocoa drops. I started making them for Santa. Although I make a lot of homemade cookies, these are the ones the always request. I think they are more like candy because there is no baking. They are delicious though.

I bought the cutest cupcake liners from Wilton.


They look like tulips. I also bought some Hershey eggs kinda like M&M's.


I made the recipe that is below and dropped them in little piles on waxed paper. Then I dressed them up to be more Eastery (I know not a word). At Christmas I just do them plain.

 I wanted them to look like little bird nests.


When they dried I placed them in the tulip liners. I then added my Peep centerpiece on the tray.


I love how cute this looks!


This is an easy last minute dessert to add to your Easter dinner! I will be taking this to my parent's house for Easter. I know they will not last long!

Cocoa Drops
2 cups sugar
3T cocoa
1 stick butter
1/2 cup milk
1/2 cup peanut butter
1 tsp vanilla
3 cups old fashioned oats
Mix first 4 ingredients together in a pot on med heat. Bring to a boil. Add peanut butter vanilla and oats. Let cook till it starts getting thick. Remove from heat. Drop on waxed paper a spoonful of mixture. These can be as big as you like. Let dry and cool. For nests add candy eggs to center and put in liner if desired. Makes around 2 dozen. depending on size


Friday, April 22, 2011

Little Chair Redo

Happy Friday!
I am really excited over the giveaway so far. Really great comments too! Press on Giveaway to enter!

Don't Forget to enter the GIVEAWAY!

 I have had this little chair in my office for a long time. It is small so everyone uses it to sit next to me when I am on the computer. The problem is has an awful red seat! It has been painted white but I never got a chance to reupholster it.

This is the before.....


I sanded it and used a leftover piece of material that I used for my other chair. 
It is more presentable now and really didn't take the much time. I don't know why I put it off!!!!

This is the after.....


I really love this material so I am glad I had a little extra for this chair! This is making me want to redo my whole office! Blogging is creating more work to do!!!!! LOL It really needs a makeover!
But for now I will enjoy the weekend with my family! Happy Easter! Tomorrow I will have the last Easter project I will do....hint: Its yummy!


Thanks for the feature!
The Path Before Me


Linking to
Miss Mustard Seed's Creative BlogRedoux

Thursday, April 21, 2011

Utensil Drawer Organizer


I am really excited about this project. Anytime you can do something for free that excites me! If it excites you go over to the sidebar on this page and press that FOLLOW button! I love looking for new ideas to show you!

I have been collecting paint sticks from Home Depot and Lowes for awhile because in my crazy mind I figured I can make something with them...... and.... well..... they are free!

As I was putting the forks and spoons back in the drawer the light bulb went off in my head. I really hate the plastic organizer I have in the drawer separating all the utensils.


What if I use the paint sticks and make my own dividers?

I started out with these.....


I drew up a plan of how I wanted this to be laid out in the drawer and measured and marked each stick. With a handsaw I cut to size. I didn't want it to be permanently attached to the drawer so I can clean the bottom if it gets dirty. So I made it to come out. I cut the pieces and glued each one.


I lined the drawer with shelving paper. This is a clear non-stick roll of a rubber liner.


After measuring and cutting the liner to fit, I placed the paint stick form into the drawer. Now it looks custom and did I mention it was FREE!!!!

BEFORE......


AFTER........


I loved this project! I think I will do the rest of the drawers too! I even got more space out of it to store even more!!!  And I think I will continue saving the sticks! I have some more ides for them!

So what do you think? If you like this Follow me on my journey to create!

COST: $0
If you like this you will love my new and improved Baking Utensil Organizer! CLICK HERE!

Wednesday, April 20, 2011

Last Minute Easter decor

200th Follower Giveaway HERE!


I was refinishing an end table this weekend and in the yard was this pinecone. I thought it was weird that there was just one sitting there. It was kinda closed up and narrow.
I kept staring at it and thought it would make a cute Easter decoration.

I started with this.....

  I got out some orange paint and painted it all over.....


I cut some green ribbon and attached to the top with hot glue.....


Now it looks like a cute little carrot! And it is perfect for my Twiggy Rabbit!


Another quick and easy project that is A-dorable!

Don't forget to enter my giveaway!


Grab My Button