recent posts...

Monday, April 2, 2012

Scrumptious Lemon Cake

There is just something about lemons and springtime. The bright yellow and tart taste scream spring and summer. I wanted to share with you one of my favorite Lemon Cake recipes. This recipe is from the Barefoot Contessa.


Preheat the oven at 350 degrees and grease and flour two loaf pans. Cream Butter and 2 cups sugar. Add eggs 1 at a time and the lemon zest.

All the fresh lemon is what makes this scrumptious!!


Stir the flour, baking powder, soda, and salt in bowl. In another bowl combine 1/4 c lemon juice, buttermilk, and vanilla. Add the flour and buttermilk mixture alternately to the batter.


Divide the batter evenly between the pans and smooth top. Bake for 45 min to an hour. Do not overcook!!


Combing 1/2 c granulated sugar with 1/2 c lemon juice in a saucepan and cook over low heat until sugar dissolves.


When cakes are done allow to cool 10 min. Remove from pans and set them on a rack over a tray and spoon lemon syrup over them. Allow to cool.


For glaze, combine the confectioners sugar and the lemon juice in a bowl til smooth. Pour over cakes and let drizzle down sides.


I love this because it makes two loaves. Great to keep one and give one away! You can also freeze for a treat later on!

I hope you enjoy it! Let me know if you bake this and I will give you a shout out!!

Ingredients
1/2 pound unsalted butter
2 1/2 c sugar
4 extra large eggs at room temp
1/3 cup grated lemon zest (6-8 lemons)
3c flour
1/2 t baking powder
1/2 t baking soda
 1 t salt
3/4 cup freshly squeezed lemon juice, divided
3/4 c buttermilk
1 t pure vanilla

For Glaze
2 c confectioners' sugar, sifted
3 1/2 T freshly squeezed lemon juice

ENJOY!

Great for Easter!


HouseofHepworthsPositively Splendidtp://sweet-as-sugar-cookies.blogspot.com/" target="_blank">

Thursday, March 29, 2012

Brown Paper Roses

I want to continue with my post on How to Make Paper Flowers. I made several paper flowers to add to the Bridal Show space. Remember these are great decorations for any event. They can be made large or small!


Ironically these are made similar to the Daisy flower below


This time you will follow the instructions given here but you will do three rows of 4 petals in a graduating size.

You will hot glue them together and instead of a balled up middle you will roll your scrap and glue to center.


Fluff out the petals and you will have a rose!!

Questions? Just ask!!!


 I love these! I cannot wait to try some on a smaller scale! These roses were great to just sit on the floor.

Simple and Easy!

Tuesday, March 27, 2012

How to make Paper Flowers


A few weeks ago I designed a booth for a bridal show. It was an outdoor theme and we had to come up with inexpensive decor. Making anything that costs next to nothing is always fun when it turns out so pretty.

Our colors to work with were yellow and blue. There were three different types of flowers created.

Small yellow and white roses


 This is the rose before I painted it with ink lines and everything lol!


Large Brown Paper Roses


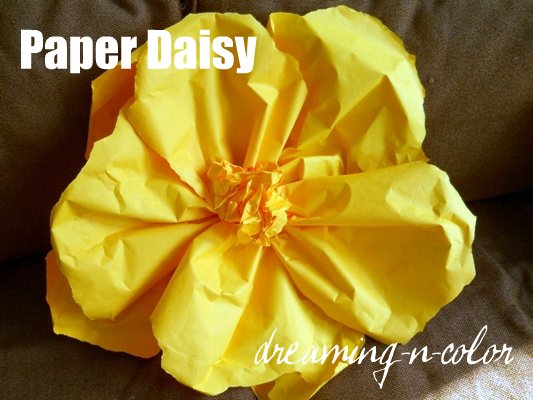
Colorful blue and Yellow Daisies


I am going to show you how to make the daisy flowers we hung on the wall.

Materials:

Solid color paper (any kind will work)
stapler
hot glue

I began roughly cutting strips of paper. The glory of this is it does not have to be exact!


Then I cut to the size petal I wanted which decides the size of the bloom. I cut mine in thirds.


I then began to tear of the ends to make a rounded edge. Again nothing exact.


Then I gathered the paper on the straight edge and pinched together and stapled.


This will form the petal. I made four individual ones/

 I then stapled all four together. This will form the first layer.


Again there is no reason to be exact. This adds to the character of it.

Do the same steps to make another layer. With this flower you should have two layers.


Hot Glue one layer on top of the other.


Gather all scraps that you would normally throw away and crumple in a ball


This becomes the center of the flower. Glue to the center and you are done!


These make a great party decoration! By adding this to our curtain wall it enhanced the colors of the booth. It gave it an Anthropologie feel.

 Let me know what you think! If you would like to know how to make the others let me know and maybe I will do another post.

Now that spring and summer approach we will have beautiful fresh flowers but this is a great inexpensive alternative!


oopsey daisy buttonhomework

Sunday, March 25, 2012

DIY Network or HGTV

I love watching design shows. They stimulate and make me want to create something beautiful. I have been watching design shows forever! I remember watching Robb Weller on The Home Show when it first aired. Who can forget Christopher Lowell? He probably got me thinking outside the box the most. I first learned how to paint furniture from him.


But when Home and Garden Television entered the scene I was in heaven. I could not wait to watch the next design show. My husband got tired of my constant reference to "what they do on HGTV" and all the hogging of the television to watch "just one more show"

Everyday there was a show just as good as the day before. OH! I miss those days!!

What happened? I can't turn on the channel anymore. I am always looking for new design shows but all I ever find is property shows.

That is why I was so excited when Layla and Kevin from The Lettered Cottage did a pilot for HGTV. I did a post on it here. Then I got discouraged when I found out they did not accept it. COME ON HGTV!!! You need them! The production company is going to send it to other networks to see if they will pick it up.

I have been watching more of the DIY Network lately. At least when I get the chance to sit down and watch a little TV. The surprise....there are design shows on DIY Network. Imagine that. Is HGTV trying to push us to that network. I know they are related so maybe that is what they are trying to do. I don't get it.

So I ask you.......DIY Network or HGTV? Which one do you prefer? 

Maybe the pilot will go on to the DIY Network

Thursday, March 22, 2012

Nesting Bird Side Table

I have really enjoyed painting outside the last couple of days. The weather in Tennessee has been beautiful. A nice change from all the horrible storms that came through a few weeks ago.

One of the pieces I did was an old side table. I actually had an idea in mind when I came across some awesome knobs on clearance. You know I love knobs. I think is is quite the obsession! If I like them and they are reasonable I will buy them before I have something to put it on as in this case.

I have been decorating for spring and just finished my Spring Mantle. I remembered buying some little bird knobs. I just fell in love with them. They are so cute!

So I pulled out this side table.


Very boring but has some nice lines to it. I like the glass doors. So as I was trying to decide what to do with this, the only thing I knew for sure is what knobs I wanted.

I then decided to break the glass out. Oh yes I did!!!


Funny when you want things to break it is much harder then it looks and it doesn't always break the first time. After repeated blows of the hammer, it came crashing through. Remember to use safety glasses when breaking glass! It is also good to have gloves on to remove it. This came out pretty clean so it wasn't hard to remove.

I painted it Duck Egg. I then applied some chicken wire to the area where the glass came out. It kinda went with the overall look I wanted. Then I came across a big problem. The pulls I wanted to use didn't work together. They were too big side by side.
The doors would not open and close right. BUMMER!

So back to the drawing board. Well that's what I thought until I cam up with another idea.

I decided to fill one of the holes with wood putty. This allowed one of the pulls to be used. I worked perfectly too because there was a magnetic piece to hold the doors shut.


Isn't she just adorable? It just works so well with this piece. It makes me happy just to look at it.


I added both clear and dark wax to a lightly distressed look.


It just feels like spring to me. What about you? Tell me what you think!!

What would you have done with it? I think it is fun to let the knob piece speak to you!

Before


After
I am joining Debbie at her Alumni Party! Go check it out HERE!

Miss Mustard Seed's Creative Blog

Tuesday, March 20, 2012

Pine Cone Carrot

 This is a repost from last year but one that is fun and easy so I decided to reintroduce it.


I was refinishing an end table this weekend and in the yard was this pine cone. I thought it was weird that there was just one sitting there. It was kinda closed up and narrow.
I kept staring at it and thought it would make a cute Easter decoration.

I started with this.....

  I got out some orange paint and painted it all over.....


I cut some green ribbon and attached to the top with hot glue.....


Now it looks like a cute little carrot! And it is perfect for my Twiggy Rabbit!


Another quick and easy project that is A-dorable!